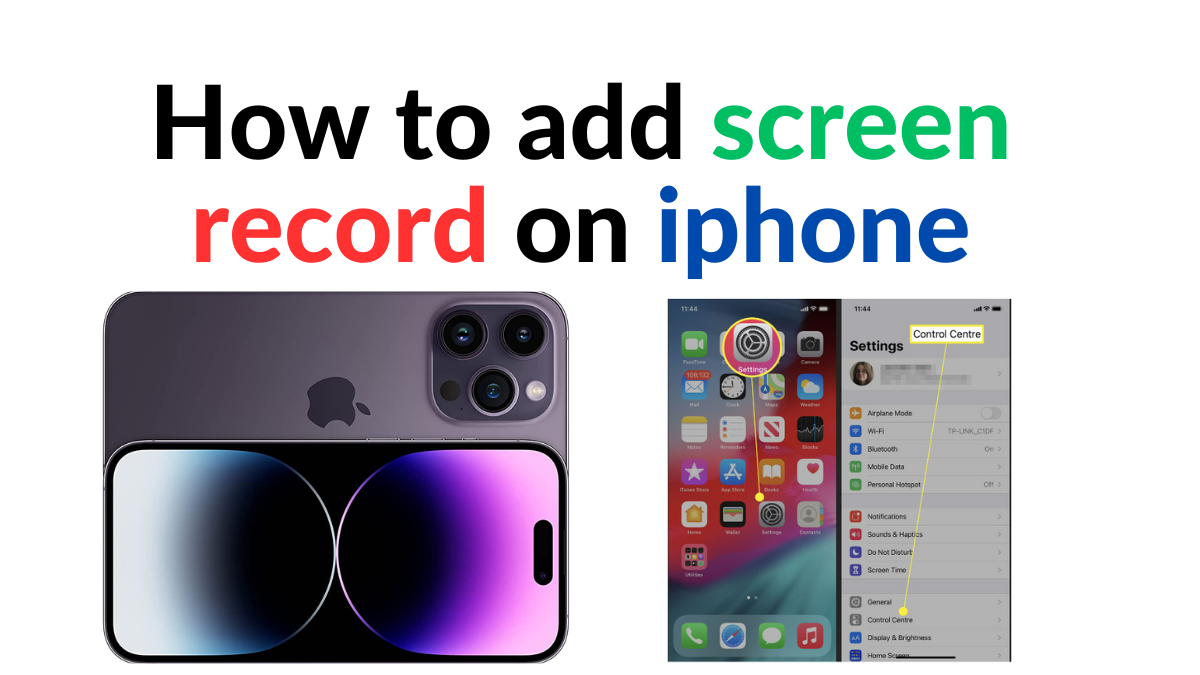
Want a screen record, but unsure how to add screen record on iphone? Let’s do this fast. You can easily add a screen recording feature to your iPhone by following these simple steps:
- Go to setting option and open the Control Center on your iPhone by swiping down from the top right corner of the screen on iPhone X or later, or swipe up from the bottom of the screen on earlier models.
- Press and hold the Screen Recording icon, which looks like a circle surrounded by another circle.
- A new menu will appear, where you can customize the settings of your screen recording. You can choose to record audio from your microphone, turn on/off the camera, and set a timer for your recording.
- Once you have customized your settings, tap on “Start Recording” to begin your screen recording. You will see a 3-second countdown and then the recording will start.
- To stop the screen recording, simply tap on the red recording icon in the top left corner of the screen, or you can also go back to the Control Center area and once again tap on the Screen Recording icon.
- Your screen recording will be saved to your Photos app, where you can edit or share it with others.
That’s it! With just a few simple steps, you can add screen recording to your iPhone and capture everything that’s happening on your screen.
The top 10 eCommerce plugins for wordpress 2023
If you want to access additional screen recording options, you can go to the Settings app on your iPhone and select “Control Center”. From there, you can add or remove different controls that appear in the Control Center, including the Screen Recording feature.
Another helpful tip when using screen recording on your iPhone is to remember to turn off the microphone or any other audio sources when you don’t want them to be recorded. This can help you avoid recording any unwanted sounds or conversations.
It’s also worth noting that screen recording may not be available in certain apps or under certain circumstances due to app-specific restrictions or privacy settings. If you’re having trouble using screen recording, you may want to check the app’s settings or consult the app’s documentation or support resources.
How to add screen record on iphone 14
The steps to add screen recording to an iPhone 14 are similar to other iPhone models. Here’s how you can do it:
- Go to the setting option on your iphone. Scroll down from the top right corner of the screen for opening the Control Center.
- Locate the Screen Recording icon. It looks like a circle surrounded by another circle with a dot inside.
- If you don’t find the Screen Recording icon in the Control Center, don’t worry. You need to add it first which is simple. Go to Settings > click “Control Center” > click “Customize Controls”. After that, find Screen Recording and tap the green plus sign next to it to successfully add it to the Control Center.
- Press and hold the Screen Recording icon until the Screen Recording menu appears.
- You can customize the Screen Recording settings by tapping on the microphone or camera icons to turn them on or off, or by tapping the “Options” button to adjust the recording settings.
- Tap “Start Recording” to begin recording your screen. Instantly a three-second countdown will appear to start the recording.
- To stop recording, tap the red recording icon in the upper-left corner of the screen, or swipe up from the bottom of the screen and tap the Screen Recording icon again.
- The recorded video will be saved to your Photos app.
That’s it! You can now easily add screen recording to your iPhone 14 and capture everything that’s happening on your screen.
Overall, screen recording can be a valuable tool for capturing and sharing what’s happening on your iPhone screen. With a few simple steps, you can easily add this feature to your device and start recording your screen in no time.
About Iphone
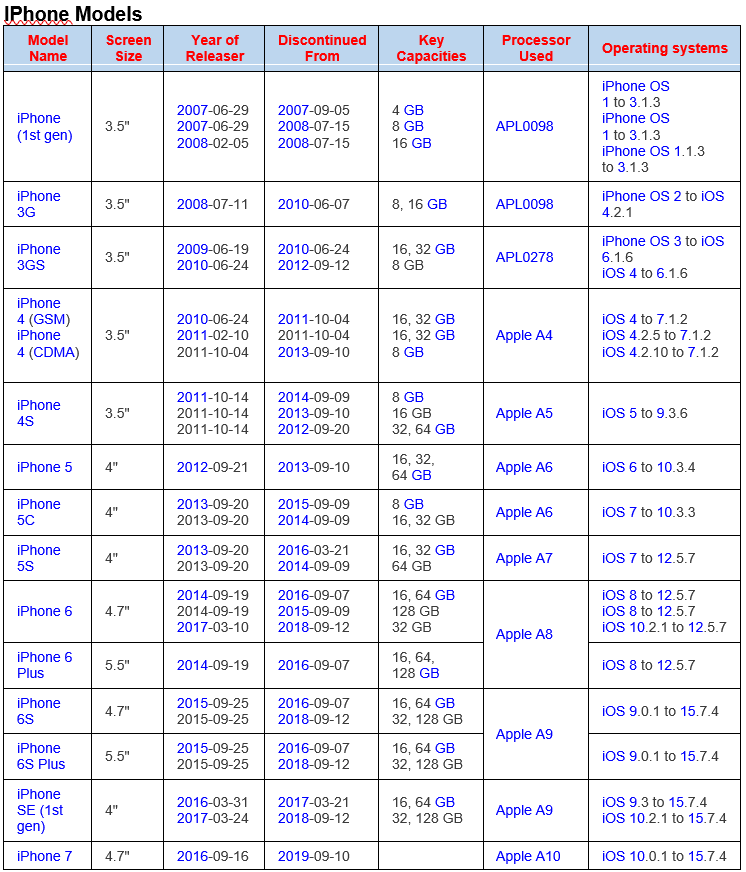
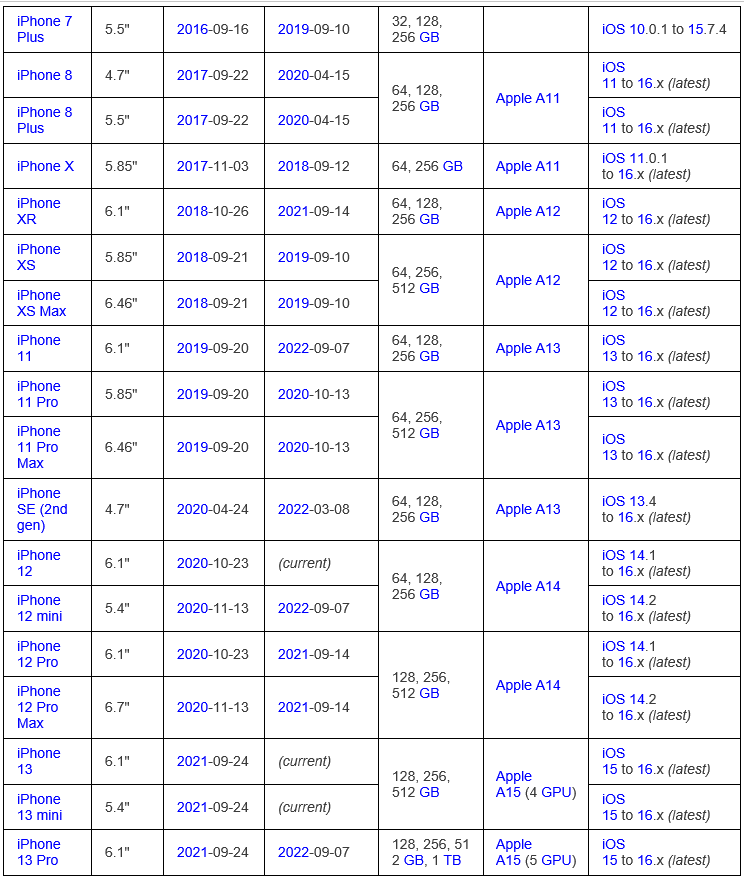
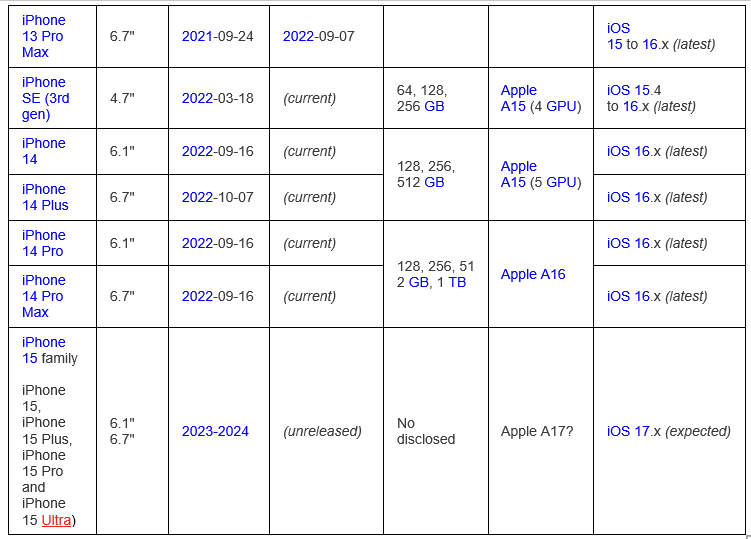
The iPhone is a stop-class and high-end smartphone brand designed and marketed by Apple Inc. The first iPhone was announced in January 2007 by then-CEO Steve Jobs and released later that year. Since then, Apple has released many iterations of the iPhone, including the iPhone 14 series as of September 2021.
The iPhone runs on Apple’s iOS operating system and features a touchscreen display, a camera, and various other features such as access to the App Store, Siri voice assistant, and Apple Music. iPhones are known for their sleek design, advanced features, and user-friendly interface. They have become incredibly popular around the world and are used by millions of people for personal and professional purposes.
Over the years, the iPhone has evolved to become more than just a phone. It can be used to take photos and videos, send messages, make video calls, play games, browse the internet, and even control smart home devices. The iPhone also offers a range of accessibility features such as voice control and assistive touch, which make it easier for people with disabilities to use.
The iPhone has demonstrated a significant impact on the technology industry and has sharply changed the way we communicate, work, and live our lives. It has inspired many other smartphone manufacturers to improve their products and has set the standard for quality and innovation in the mobile phone industry.
One of the most significant developments in recent years has been the introduction of 5G technology, which offers faster internet speeds and better connectivity. The iPhone 12 series was the first iPhone to include 5G capabilities, and it is likely that future iPhone models will continue to feature this technology.
Despite the many benefits of the iPhone, it has also been criticized for its high price and limited customization options. However, it remains a popular choice for many people who value its advanced features, reliability, and integration with other Apple products such as the Apple Watch and AirPods.